I recently started working through the fast.ai “Practical Deep Learning for Coders” course again. I had watched the videos a couple years ago, but never did any of the exercises and didn’t learn as much as I could have.This time I’m using the book version and planning to do some write ups based on the hands-on exercises and experiments.
The first example in the book is a cat/dog classifier, which is basically the “hello world” of deep learning. With the fastai framework that is built on top of PyTorch, this can be done in very few lines of code. So in this regard, fastai is sort of like scikit-learn, except for deep learning instead of machine learning.
So for this first write up, I decided to do a “Curry” detector, specifically I wanted to build a model that tell the difference Steph Curry, Seth Curry, and Thai curry.
I decided on a “Curry” detector for a couple reasons. First is that it seemed relatively easy and likely to succeed. The book emphasizes that its important to experiment and to not get too worried about doing something amazing. It’s better to start and apply the concepts and work with the code. The second reason is that I couldn’t think of that many interesting ideas for image classification, though I will post some of the other ideas I had considered.
On the topic of experiments, I really appreciate how the course developers have put in a lot of work into making it easy to get started with running the code, which is important for lowering the barrier to getting started. I basically created a free account on Gradient Paperspace, selected the Fast.AI sample notebook and was able to run the examples from the Jupyter notebooks.
Code walkthrough
First we want to import the python libraries that we plan to use. The sample notebook contains a utils.py file with some utility functions.
from utils import *
from fastai.vision.widgets import *
Next we need to get some images of Steph Curry, Seth Curry, and Thai curry to build a dataset for training. Here we leverage the Bing Search API to download some images to quickly build a labeled data set. The benefit of this is that it’s fast and easy. The drawback as we’ll find out is that the images from Bing may not be perfect. However as a way to get started, this is very helpful.
# Bing Search API key (need to sign up for Azure)
key = ""

curry_types = ("steph", "seth", "thai")
path = Path("curry")

# Only download images if they don't exist
if not path.exists():
	path.mkdir()
    # For each curry type, search bing, then download
    # the images
    for o in curry_types:
        dest = (path/o)
        dest.mkdir(exist_ok=True)
        results = search_images_bing(key, f'{o} curry')
        download_images(dest, urls=results.attrgot('content_url'))

# Get the images we've downloaded
fns = get_image_files(path)

# Some images may not have been downloaded correctly,
# so we'll want to remove those
failed = verify_images(fns)
failed.map(Path.unlink)
Now that we have a dataset, we need to format the images to be used by the fastai framework. To do this, fastai provides a DataBlock class which appears to be a factory class that helps with creating DataSet and DataLoader classes based on various options and settings. The nice thing is that the DataBlock class is able to handle many different types of data, such as images. The other helpful feature is that the framework provides functions for image transforms, such as resizing and skewing. The latter transforms are interesting in that they distort the image, but apparently this helps improve accuracy by providing variations of the image.
For instance, here we’ll use the RandomResizedCrop image transform function. Here we want images resized to 224x224 pixel squares to match the size of the images used by the ResNet pre-trained convolutional neural network that we will be using as our base. The RandomResizedCrop seems like it will randomly resize the image and then crop it. The important part about cropping the image is that aspect ratio will be preserved and black bars won’t be added if the image isn’t a perfect square.
curries = DataBlock(
    blocks=(ImageBlock, CategoryBlock),
    get_items=get_image_files,
    # Randomly split 20% to be validation set
    splitter=RandomSplitter(valid_pct=0.2, seed=1),
    get_y=parent_label,
    # The images are 224x224 pixels because the Resnet
    # pretrainined convolutional neural network
    item_tfms=RandomResizedCrop(224, min_scale=0.5),
)

dls = curries.dataloaders(path)
Once we have our images set up, we can run the cnn_learner using the resnet18 (pre-trained convolutional neural network with 18 layers). I’m not exactly sure why we use resnet18 and not one of the other variations.
We use a CNN since apparently it’s really effective for image classification. I think the book will explain why in later chapters since it takes a top down approach to teaching deep learning.
The fine_tune method is used since we’re using a pretrained model and building off of that. Apparently this is called transfer learning. And one big benefit of this is that it allows us to train the model for specific tasks using less data and resources by leveraging an existing model. With transfer learning we replace the last layer with our custom layer. We pass in a value of four to look at each image four times. They call these epochs. The interesting thing is that you can train it for two epochs, save the model, then train it for another two epochs later. The thing to watch out for is doing too many epochs which may lead to overfitting.
learn = cnn_learner(dls, resnet18, metrics=error_rate)
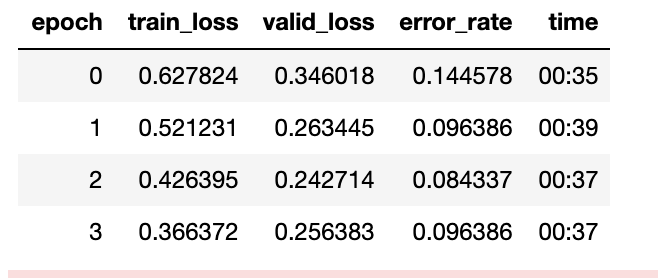
learn.fine_tune(4)
Finally we can check the performance of our model
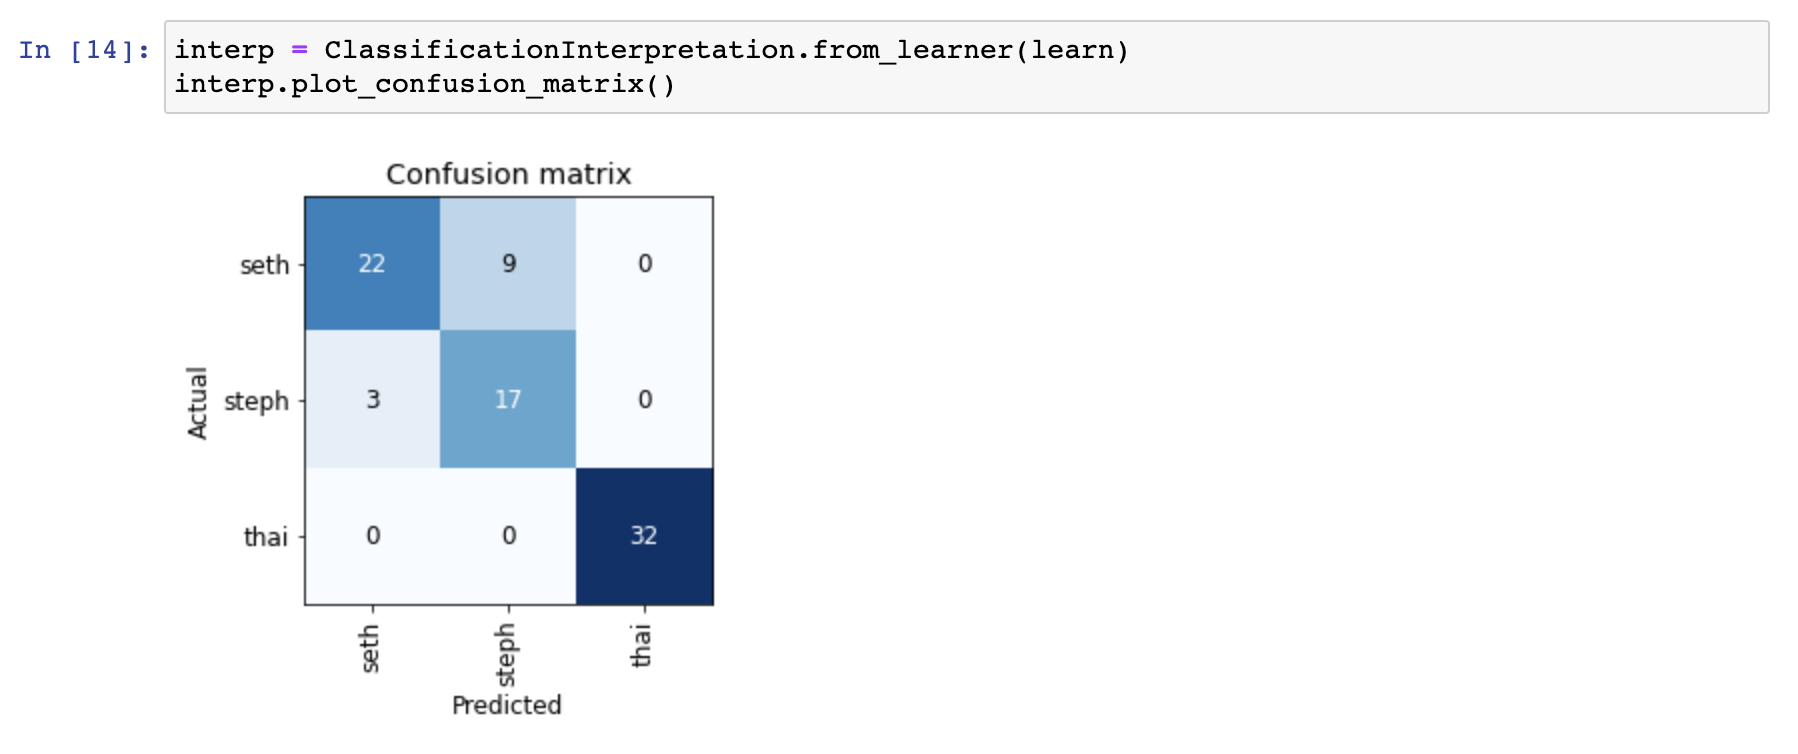
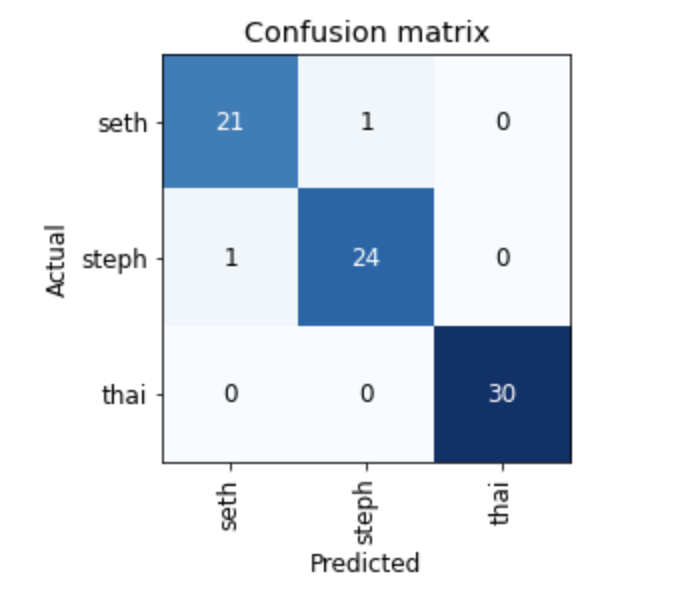
interp = ClassificationInterpretation.from_learner(learn)
interp.plot_confusion_matrix()
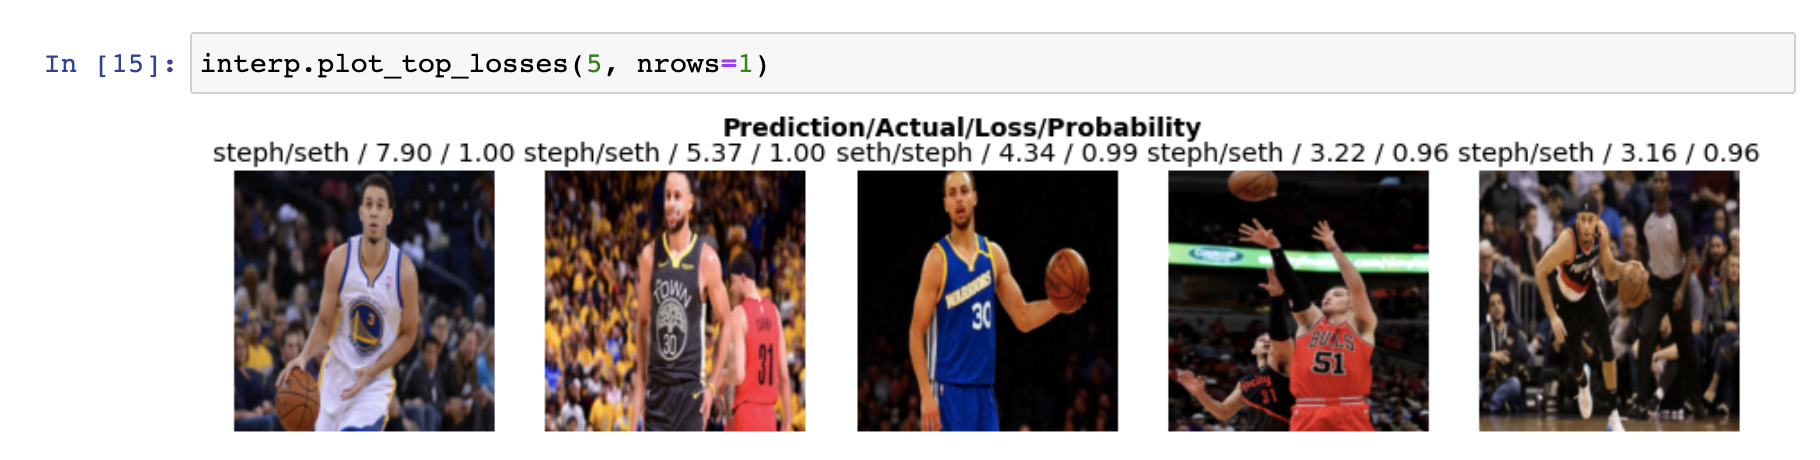
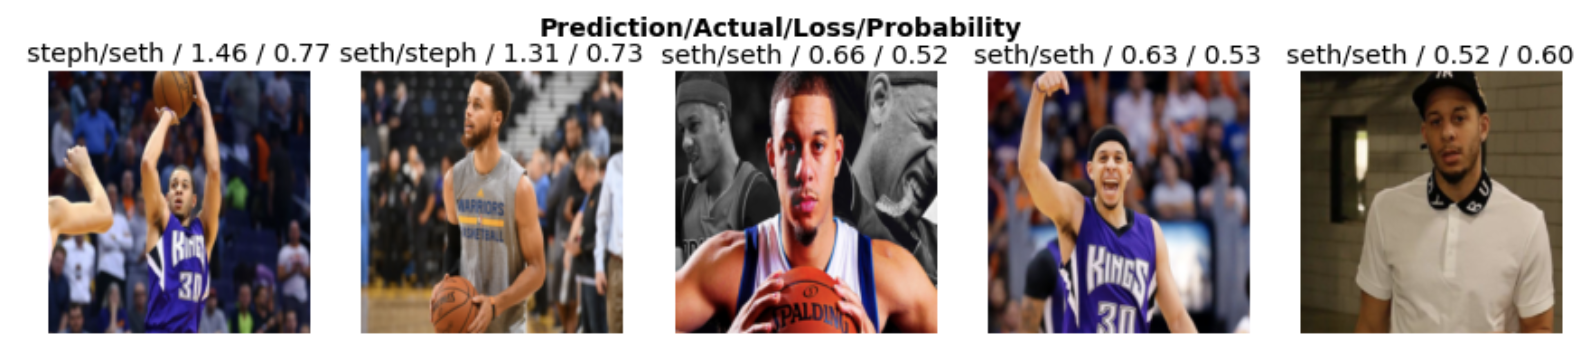
interp.plot_top_losses(5, nrows=1)
Initial results
The initial results weren’t great. When I looked at the dataset, the main issue was that the Seth images had a fair amount of images that contained both Steph and Seth in them.
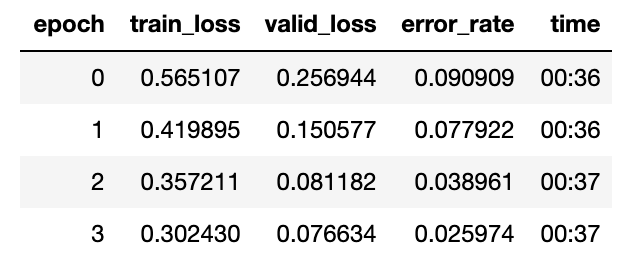
Improved results
After manually cleaning up the images with both Steph and Seth Curry in them, the results improved quite a bit.
Appendix A: Manually cleaning up the dataset
Manually cleaning up the dataset was not too intuitive. The fastai framework does include a nifty image cleaner feature which allows you to delete and recategorize images. The problem is that it doesn’t allow you to cycle through all the images, only a small subset.

This means that I had to manually download the images and re-upload them to the dev environment. The Jupyter notebook UI only allows me to download one image at a time (rather than a whole folder), so I had to zip up the images using the terminal before downloading the images.
One weird thing is that when I unzipped the images, the folders didn’t have the executable permission, so I needed to chmod the folders. After that I just cycled through the images and deleted bad images.
Appendix B: Other ideas
- Toyota Camry versus Honda Accord versus Tesla
- Playing card detector for a bot that can play live poker
- Major or minor chord progression detector by converting the sound waves to images
- Guitar tuner bot