1. Intro
I see maneki neko’s quite a bit. And it occured to me one day: how many waves do those things do in one day?
2. Video
Here is a video of the maneki neko wave counter in action.
3. Features
The features are pretty limited.
- Counts maneki neko waves. The IR sensor needs to be placed perpendicular to the end
of the paw. The
WAVE_DOWN_DISTANCE_CMandWAVE_UP_DISTANCE_CMconstants will need to be adjusted based on the maneki neko’s size. A wave is counted as a complete down and up motion. - The LCD background can be toggled by clicking the select button on the LCD Shield.
The available colors can be adjusted by modifying the
colorsarray.
4. Components
Here are the components needed for this simple project.
- Sharp GP2Y0A41SKOF IR Sensor (4cm - 30cm)
- Mine came with a JST Connector
- Arduino UNO Rev3 (or compatible board)
- DF Robot - I2C RGB Backlight LCD 16x2 Display Module for Arduino
- I bought the shield because I wanted something simple (i.e. no soldering), but it should be possible to find a non-shield version of the LCD display module.
- 3 M/F jumper wires for IR Sensor
- Analog pin
- Ground
- Power
- Maneki Neko
- Can buy from Ebay
5. Wiring
The wiring is pretty straightforward. All we need to do is connect the Sharp IR Sensor to the Arduino.
The Sharp IR Sensor has three pins:
- Analog pin to receive sensor output
- Power
- Ground
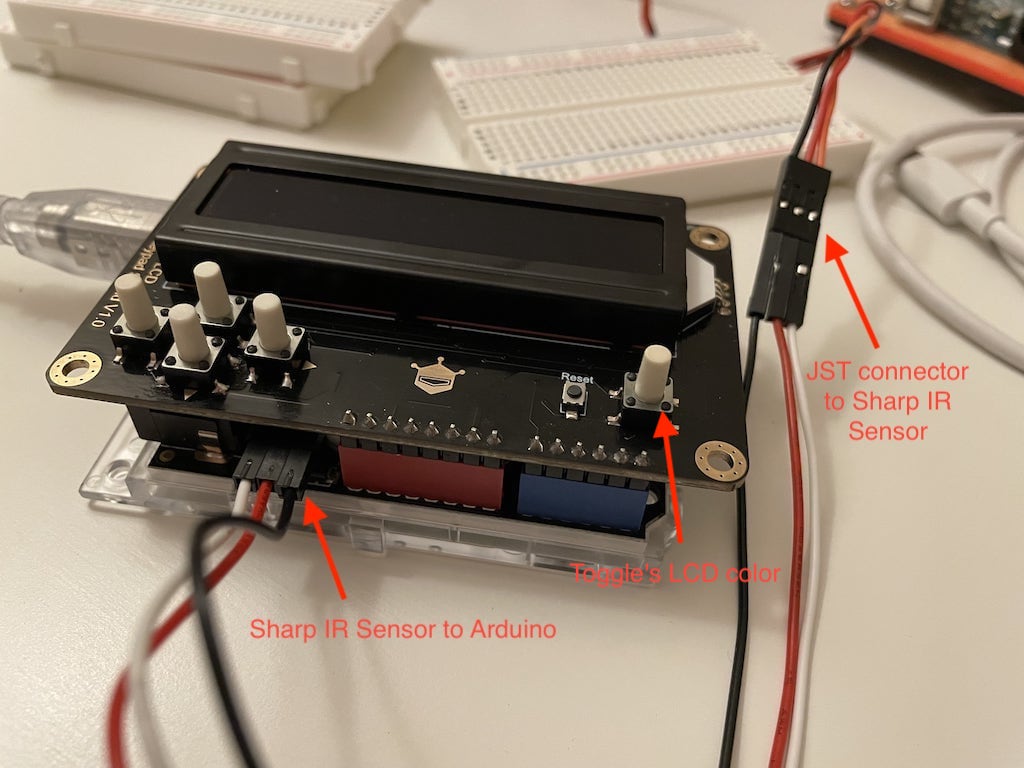
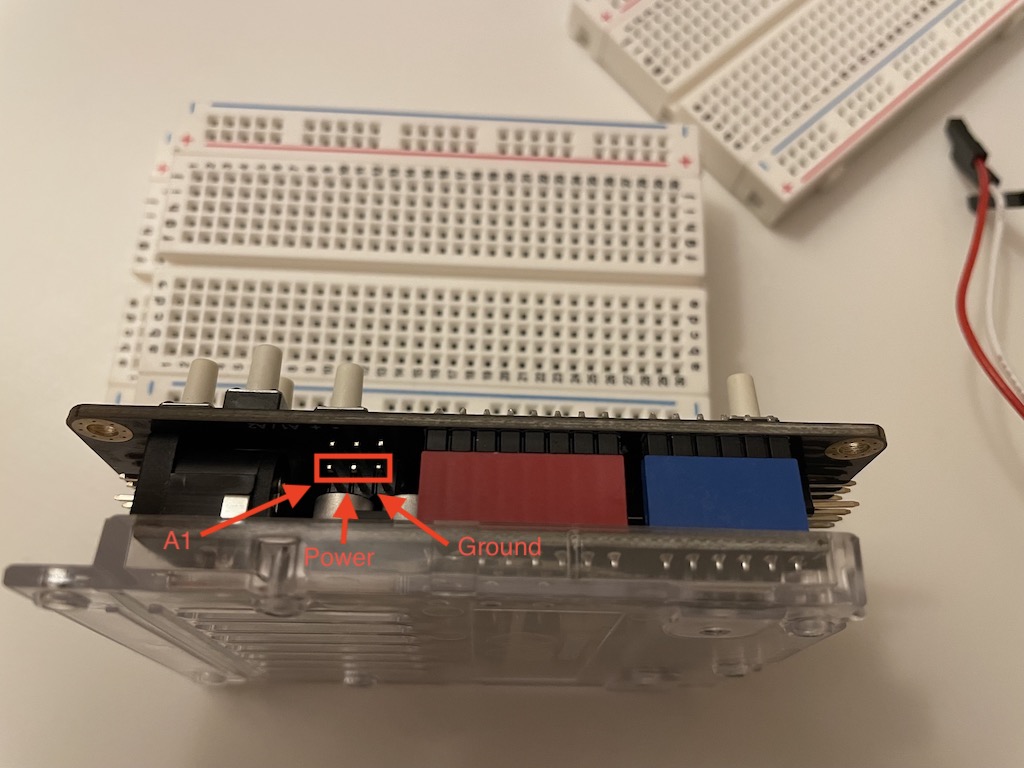
To connect the Sharp IR sensor to the Arduino, we need to connect the wires to the DF Robot LCD Shield which exposes multiple pins for sensors. We will use the A1 pin, but you can also use other analog pins.
6. The Sketch
Here is the sketch I used. For the most up to date version, see the Github repository.
The LCD library is from this Github repository: https://github.com/DFRobot/DFRobot_RGBLCD1602. I installed the repository using the Arduino IDE library manager. This sketch uses the 1.0 version of this library. Make sure to install the right one since the interfaces are slightly different, namely the constructor.
#include "DFRobot_RGBLCD1602.h"  // Using version 1.0 of the library

// Update these values based on your waving cat.
#define WAVE_UP_DISTANCE_CM 40
#define WAVE_DOWN_DISTANCE_CM 6
// Enable debugging through Serial
#define DEBUG false
// Used for checking presses to `select` button.
#define LCD_BTNS A0
// Sharp IR GP2Y0A41SKOF (4-30cm, analog)
#define IR_SENSOR A1
#define COLS 16
#define ROWS 2
#define NUM_COLORS 7
#define SELECT_BTN_MIN_VAL 800
#define SELECT_BTN_MAX_VAL 850
#define NO_BTN_MIN_VAL 1000

struct Rgb{
   int red;
   int green;
   int blue;
};

// Constants
const Rgb kRed = {255, 0, 0};
const Rgb kOrange = {255, 140, 0};
const Rgb kYellow = {255, 255, 0};
const Rgb kGreen = {0, 255, 0};
const Rgb kBlue = {0, 0, 255};
const Rgb kIndigo = {255, 0, 255};
const Rgb kViolet = {238, 130, 238};

const String kLcdText = "Number of waves:";

// Variables

// LCD library.
DFRobot_RGBLCD1602 lcd(/*lcdCols=*/COLS,/*lcdRows=*/ROWS);
// Available background colors.
Rgb colors[NUM_COLORS] = {kRed, kOrange, kYellow, kGreen, kBlue, kIndigo, kViolet};
// Current background color. Used for cycling through different colors
// in `colors` array.
int colorIndex = 0;
// Tracks select button presses.
bool hasPressedSelect = false;
// Tracks a hand wave.
bool hasWaved = false;
// Number of hand waves (4,294,967,295 max).
unsigned long waveCount = 0;

void setup() {
  if (DEBUG) {
    Serial.begin(9600);
  }
  lcd.init();
  setLcdBg(colors[colorIndex]);
  lcd.print(kLcdText);
  updateLcdWaveCount(waveCount);
}

void loop() {
  int distanceCm = calcIrDistance();

  // Add a small delay to avoid unnecessary processing.
  delay(100);

  if (DEBUG) {
    Serial.println(distanceCm);
  }

  if (selectPressed()) {
    updateLcdColor();
  }

  if (waveFinished(distanceCm)) {
    ++waveCount;
    updateLcdWaveCount(waveCount);
  }
}

// Returns true if `select` button was pressed.
//
// The buttons all feed into the `LCD_BTNS` analog pin. Each
// button split within a range of 0-1023.
//
// The `select` button supposedly yields a value of 824. But
// since there may be interference in the signal, we add some
// buffer.
//
// When no value is present, the value should be 1023, but we
// will also provide a buffer here too.
//
// A button press consists of a signal of 824 followed by a
// signal of 1023. Otherwise multiple presses may be registered.
bool selectPressed() {
  int lcdKeyInput = analogRead(LCD_BTNS);

  // This is the range for `select` being pressed.
  if (lcdKeyInput > SELECT_BTN_MIN_VAL && lcdKeyInput < SELECT_BTN_MAX_VAL) {
    if (!hasPressedSelect) {
      hasPressedSelect = true;
    }
  } else if (hasPressedSelect && lcdKeyInput > NO_BTN_MIN_VAL) {
    hasPressedSelect = false;
    return true;
  }
  return false;
}

// Tracks whether that has finished waving. A wave consists
// of a down swing followed by an up swing.
bool waveFinished(int distanceCm) {
  if (!hasWaved && distanceCm <= WAVE_DOWN_DISTANCE_CM) {
    hasWaved = true;
  } else if (hasWaved && distanceCm > WAVE_UP_DISTANCE_CM) {
    hasWaved = false;
    return true;
  }
  return false;
}

// Cycles through the available LCD colors.
void updateLcdColor() {
  colorIndex = (colorIndex + 1) % NUM_COLORS;
  setLcdBg(colors[colorIndex]);
}

// Sets the LCD background color with the given RGB values.
void setLcdBg(Rgb color) {
  lcd.setRGB(color.red, color.green, color.blue);
}

// Updates the wave count on the LCD display.
void updateLcdWaveCount(unsigned long count) {
  lcd.setCursor(0, 1);
  lcd.print(count);
}

// Calculates distance in centimeters from the IR sensor.
// Formula from: https://www.smart-prototyping.com/blog/Sharp-Distance-Measuring-Sensor-GP2Y0A41SK0F-Tutorial
int calcIrDistance() {
  float volts = analogRead(IR_SENSOR) * 0.0048828125;
  return 13 * pow(volts, -1);
}
7. Repository
The repository can be found here: https://github.com/richard-to/maneki-neko-wave-counter