Over the weekend, I worked on a browser-based minesweeper clone called Beersweeper. The main focus was to practice TDD and learn Jest. Jest is Facebook’s javascript unit testing framework, and it works well with React. They use Jasmine 1.X as the lower level framework, which is nice, although Jasmine 2.X has a bit cleaner API for async operations.
I’m not a big fan of TDD, having tried it in the past. One could attribute that to my own laziness mostly. It requires writing software in way that is testable, which is a noble goal. But sometimes it adds unnecessary complexity in software design. The other issue has been testing UI components, however that is less of an issue with newer unit-testing frameworks, such as Karma and Jest.
In terms of pros for TDD:
- Writing the tests first makes sure that they get written. Leaving until later usually results in no tests.
- Writing testable code does end up making the code more flexible in the long run since dependency injection (constructor injection, etc) is necessary for the code to be testable.
- The tests are self-documenting and provide usage examples.
- Also if working in a team, there’s less worry about breaking other parts of the code.
- Tests are going to be required if you’re developing serious software.
Whether TDD is the best solution, I don’t know, but I definitely know that testing is an aspect of Software Engineering.
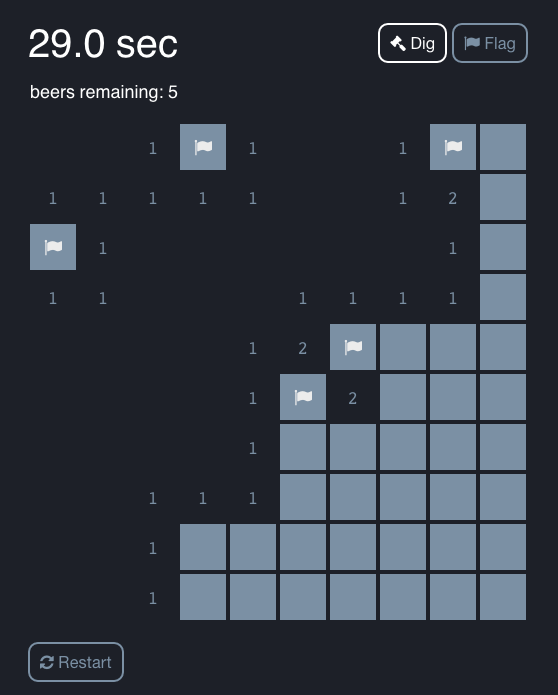
Fig. 1 - Beersweeper gameplay screenshot
For this project, I used a simplified Flux architecture. Basically I simply allowed components to directly call actions on the Store object. Normally action creators and dispatchers are used, but this game does not use any AJAX calls and does not need to dispatch actions to multiple stores. This keeps the one-way binding, but removes unnecessary layers of abstraction.
Fig. 2 - Beersweeper diagram

The game is broken up into three modules. The idea is to separate the logic and data from the view. The GameStore acts sort of like a controller in this case.
This makes testing the logic with units tests much easier and can allow for alternate UIs to be used.
GameEngine
Just a bunch of functions that operate on the Minesweeper board model. Functionality includes:
- Generating a board of Y height and X width
- Adding mines
- Calculating the digits that indicate number of adjacent mines
- Correctly unvealing squares on the board after a square is clicked
- Checking for winners
GameStore
The GameStore is created from a GameFactory. This allows options to be passed into the store. For example, to change the dimensions of the board or the number of mines.
ReactApp
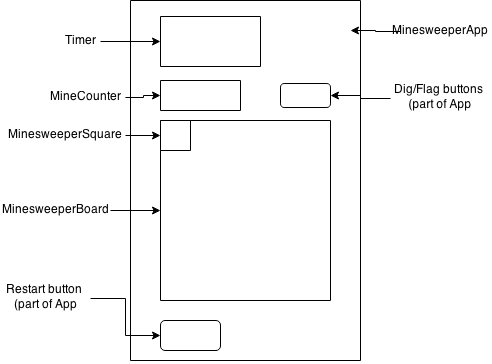
The ReactApp contains the following components:
- App: This is where the store data gets passed down to the various components. The other components get their data through props.
- MinesweeperBoard: Renders the minesweeper board with the correct number of squares
- MinesweeperSquare: Renders an individual square based on data passed from props
- MineCounter: Counts the number of mines remaining (total mines - flagged squares)
- Timer: Counts the time elapsed
Fig. 3 - Beersweeper component layout
GameEngine
Since I’ve used Jasmine before, writing tests for the GameEngine was straightforward. There’s not much to say, other than Jest provides good instructions on how to run the unit tests.
The GameEngine consists of a bunch of functions that operate on the minesweeper board model.
Data structure
The data structure used is a 2D-array of “squares,” where “squares” are regular objects with two values:
-
The value of the square: Can be 0-9, where 0 is a blank square with no adjacent mines and 9 represents a mine. The numbers 1-8, represent the number of adjacent mines.
-
There is also a state value associated with the square. This can be hidden, visible, or flagged.
One could say that you only need to generate a board with 0 and 1, where 0 is for an empty square and 1 is for a square with a mine. The adjacency numbers could then be calculated each time, but the thing is that those numbers never change, so it makes sense to do this calculation once.
The state value seems controversial, but this data is integral to the logic of the game. For example flagged squares are not revealed even if the square is empty. In addition, the algorithm to reveal squares needs to know if the a square is hidden or visible. If it’s visible, that’s a signal to stop.
The data structure was designed as just data. All operations are handled through functions. Although it didn’t work out perfectly, the idea was to make the data structure (array and squares) immutable, or at least treat them that way. This seems to have the benefit of making testing easier.
Generating mines
This function is relatively straightforward. It will throw an error if the number of mines is greater than the number of squares. This could cause an infinite loop.
The algorithm for generating the mines is: Randomly pick a y and x position. If it is empty, change the square to a mine. If it already contains a mine, repeat until an empty square is found.
var generateMines = function(board, numMines) {
  var size = getBoardSize(board);
  if (numMines > size.width * size.height) {
    throw "Number of mines is greater than board size";
  }

  var clonedBoard = cloneBoard(board);
  for (var mineCount = 0; mineCount < numMines; ++mineCount) {
    while (true) {
      var y = Math.floor(Math.random() * size.height);
      var x = Math.floor(Math.random() * size.width);
      if (clonedBoard[y][x].value === SquareValue.EMPTY) {
        clonedBoard[y][x] = createMineSquare();
        break;
      }
    }
  }
  return clonedBoard;
};
Generating adjaceny numbers
The brute force way to do it is to manually look at each adjacent square, but this can be error prone and repetitive.
An interesting solution that I learned a few days ago is to create an array of the offsets and loop through them.
I added try and catch block to avoid edge cases, such as the top row or bottom row of squares. Although these are not exceptional cases, it’s cleaner than using a convoluted if statement. Using try/except blocks like this is something that is advocated in Python code.
var countAdjacentMines = function(board, y, x) {
  var adjacentSquares = [
    [-1, -1], [-1, 0], [-1, 1],
    [ 0, -1],          [ 0, 1],
    [ 1, -1], [ 1, 0], [ 1, 1],
  ];
  var mineCount = 0;
  for (var i = 0; i < adjacentSquares.length; ++i) {
    try {
      var adjacentY = y + adjacentSquares[i][0];
      var adjacentX = x + adjacentSquares[i][1];
      if (board[adjacentY][adjacentX].value === SquareValue.MINE) {
        ++mineCount;
      }
    } catch (error) {}
  }
  return mineCount;
};
Revealing squares
In minesweeper, if you click on a square that is empty, then all adjacent squares will be revealed up to the numbered squares.
If you click on a numbered square, then only that square is revealed.
This can easily be done by thinking of the 2D array as a highly connected graph. Then a depth-first search with pre-order traversal can recursively reveal the squares. The algorithm stops whenever a numbered square is encountered.
var revealSquares = function(board, y, x) {
  var clonedBoard = cloneBoard(board);
  var adjacentSquares = [
    [-1, -1], [-1, 0], [-1, 1],
    [ 0, -1],          [ 0, 1],
    [ 1, -1], [ 1, 0], [ 1, 1],
  ];

  var _revealSquares = function(board, y, x) {
    if (board[y][x].state === SquareState.VISIBLE || board[y][x].state === SquareState.FLAG) {
      return;
    }

    if (board[y][x].value === SquareValue.MINE) {
      return;
    }

    board[y][x].state = SquareState.VISIBLE;

    if (board[y][x].value === SquareValue.EMPTY) {
      for (var i = 0; i < adjacentSquares.length; ++i) {
        try {
          var adjacentY = y + adjacentSquares[i][0];
          var adjacentX = x + adjacentSquares[i][1];
          _revealSquares(board, adjacentY, adjacentX);
        } catch (error) {}
      }
    }
  };

  _revealSquares(clonedBoard, y, x);

  return clonedBoard;
};
GameStore
There’s not much to say about the GameStore. It’s uses many of the same concepts as the typical React Store.
One change is that this module return a factory function. This allows for user specific options to be passed into the Store.
Example usage:
var GameFactory = require('./minesweeper/GameFactory');
var MinesweeperGame = GameFactory.create({
    width: 50,
    height: 10,
    numMines: 5
});
The other change, as mentioned earlier, is the lack of a dispatcher. This is because the Store actions are called directly by components.
This module does not have unit tests yet.
##$ React Components
Jest made it fairly easy to unit test React components. Admittedly, these tests were written after all the components were written. So not very TDD of me.
The mock timers were a bit confusing to use when testing the Timer component, but everything else made sense.
App Component
The AppFactory module returns a create function that allows the GameStore to be injected into the App.
This use of factories is something that I was experimenting with to avoid the use of singleton modules, which seems limit the modularity of components. I’ll have to experiment with this more to see if it is useful. This minesweeper game would have no problems with a global store since the components aren’t likely to be re-used for other purposes.
MinesweeperBoard Component
The MinesweeperBoard is also created via a create function. It requires that a MinesweeperSquare component be passed in.
The original version of this component included a minesweeper row component, which basically did nothing but wrap a div around each row of squares.
This version generates the row divs without the use of a wrapper component.
var React = require('react/addons');

var GameStatus = require('../Constants').GameStatus;

module.exports = {
  create: function(MinesweeperSquare) {
    return React.createClass({
      render: function() {
        var minesweeperRows = [];
        var size = Math.floor(this.props.width / this.props.board[0].length).toString() + "px";
        var minesweeperRows = this.props.board.map(function(row, y) {
          return <div key={"row" + y} className="minesweeper-row">{this.renderRow(row, y, size)}</div>;
        }.bind(this));
        return <div className="minesweeper-board">{minesweeperRows}</div>
      },
      renderRow: function(row, y, size) {
        return row.map(function(square, x) {
          return <MinesweeperSquare
            key={"y" + y + "x" + x}
            size={size}
            visible={this.props.status === GameStatus.LOST}
            state={square.state}
            value={square.value}
            x={x} y={y} />;
        }.bind(this));
      }
    });
  }
}
MinesweeperSquare Component
The MinesweeperSquareFactory module returns a create function that accepts a callback for when a square is clicked. This was done to avoid passing the callback from the App to the MinesweeperBoard to the MinesweeperSquare.
The MinesweeperSquare component takes the square state as two separate props. This loosens the coupling a bit since we are just passing in two primitives instead of an object reference.
With this component, I considered different squares for each type of square, but that seemed like overkill to implement a Strategy/State pattern.
Timer Component
The timer component was kind of tricky to implement, and I’m not sold that this is the best solution. It keeps track of the time elapsed using it’s own state. Start/Stop/Reset are passed in via props.
In terms of minesweeper:
- The timer starts when the first square is clicked.
- The timer stops when the user when wins or loses.
- The timer resets to 0 when restart is clicked.
Design
In terms of design, there is a tendency to want to emulate the old school look of the game. I avoided that by taking inspiration from the Windows Phone version of Minesweeper, which has a much more modern and minimal look.
Instead of right clicking to flag a square, buttons are used. This proved to be a tedious gameplay mechanic. The benefit is that mobile users should be able to play the game correctly.
There is more work to do before it is usable on mobile devices though.
TODO
I’m not entirely finished with this project. There are few more things todo:
- Add test coverage for GameStore
- Add test coverage for MinesweeperApp component
- Add win/loss message
- Add hotkeys “d” and “f” to switch from dig mode and flag mode. Clicking the buttons can be tedious.
- Make the game play well on mobile devices of different sizes.